

创建你的第一个工具
工具(tool)是一个封装在模块中、并挂接到左侧菜单的后台界面(列表、表单、仪表盘等)。本页展示如何在 Melis v6 中创建一个工具,并讲解工具的构成,让你能够放心地对其进行扩展。
请先阅读
请确保你已浏览过架构与概念——工具建立在模块、配置树、**转发(forward)和权限(rights)**之上。这些基础在 v6 中保持不变。
v6 保留了框架,替换了 UI
Melis v6 运行的是与 v5 相同的 Laminas 框架、模块和配置树。改变的是后台:经典的 /melis 界面已被 /melis-react 上的 React 外壳所取代。工具现在以原生 React “积木(brick)”的形式出现在其中,而任何尚未用 React 重写的工具依然可以在 iframe 中原封不动地运行。因此下文中构建工具的方式是相同的;只有在后台中使用它的方式是新的。相关底层机制参见 MelisReactApi 和 MelisReactOverride。
快速路径:代码生成向导
Melis 提供了 GUI 生成器,能为你脚手架出一个完整、可用的工具。在 v6 中,最常用的两个是 /melis-react 外壳中的原生 React 向导:
- Dashboard Plugin Creator —— 脚手架出一个显示在后台首页仪表盘上的小部件(widget)。
- Templating Plugin Creator —— 脚手架出一个前端 CMS 块,你可以在页面编辑器中将其拖放到页面上。
两者都从各自的左侧菜单项以顶部标签页的形式打开,顶部有一条步骤栏(step bar),右上角(紧邻 Restart)有一个 New / Old 切换开关:New 是 React 向导(默认),Old 则在 iframe 中打开经典工具。每一步都在服务器端进行校验(复用旧版 Laminas 表单),因此业务规则——保留的 PHP 关键字、重复的模块/插件名称——与以往完全一致。
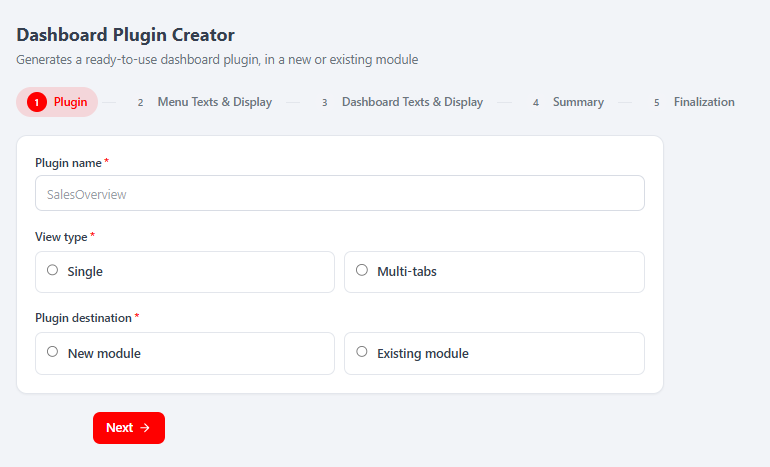 Dashboard Plugin Creator 的第 1 步:Plugin name(插件名称)、View type(视图类型:Single 单一 / Multi-tabs 多标签页)和 Plugin destination(插件目标:New module 新模块 / Existing module 已有模块),底部有 Next 按钮。
按向导逐步操作:为你的插件命名,选择新建或已有模块,按语言本地化其标题,上传缩略图,选取图标,然后查看只读的 Summary(摘要)。Finalization(完成)步骤是唯一具有变更性的操作——它会将 PHP / 视图 / 配置 / 语言文件写入磁盘,而对于新模块分支,它还会脚手架出该模块(通过底层的 MelisToolCreator 服务)、注册它、激活它并重新加载平台。
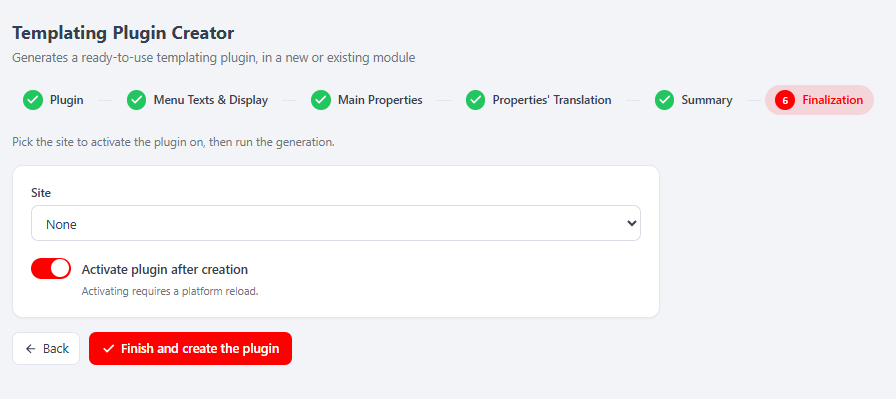 Templating Plugin Creator 的 Finalization 步骤:选择要激活的 Site(站点),保持 Activate plugin after creation(创建后激活插件)开启,然后点击 Finish and create the plugin(完成并创建插件)——向导会倒计时并重新加载平台。
Restart / New 与 Old
Restart(顶部工具栏)会清除草稿并返回第 1 步。切换到 Old 会在 iframe 中打开经典工具,并重置共享草稿——向导会先向你发出警告。
对于一个普通的后台工具(列表/表单界面,而非仪表盘或 CMS 块),底层的 MelisToolCreator 依然会脚手架出一个完整的模块骨架(配置、控制器、服务、表模型和视图)。本页的其余部分将讲解这些生成器产出了什么——这样你也能读懂、调整并手写工具。
工具的构成(生成了什么)
这部分与 v5 相同:工具依然是一个 Laminas 模块。一个典型的工具看起来像这样:
module/MyTool/
├── src/Module.php                 # merges the config files below
├── config/
│   ├── module.config.php          # routes, services, controllers, view paths
│   ├── app.interface.php          # the tool's internal UI zones + forwards
│   ├── app.tools.php              # table columns, filters, action buttons
│   └── app.toolstree.php          # where the tool sits in the left menu
├── src/MyTool/
│   ├── Controller/                # *Controller.php (extend MelisAbstractActionController)
│   ├── Service/                   # *Service.php   (extend MelisGeneralService)
│   └── Model/Tables/              # *Table.php      (Laminas TableGateway wrappers)
├── view/melis-my-tool/            # .phtml templates
└── language/{en_EN,fr_FR}.interface.php
📎 最值得参考和复制的实现是真实模块
vendor/melisplatform/melis-cms-news/和vendor/melisplatform/melis-cms-prospects/。在构建时可以将它们并排打开对照。
1. 注册模块
config/melis.module.load.php:
return [
  // … core modules …
  'MyTool',
];
2. Module.php —— 组装配置
namespace MyTool;

use Laminas\ModuleManager\Feature\ConfigProviderInterface;
use Laminas\Stdlib\ArrayUtils;

class Module implements ConfigProviderInterface
{
    public function getConfig()
    {
        $config = [];
        foreach ([
            __DIR__ . '/../config/module.config.php',
            __DIR__ . '/../config/app.interface.php',
            __DIR__ . '/../config/app.tools.php',
            __DIR__ . '/../config/app.toolstree.php',
        ] as $file) {
            $config = ArrayUtils::merge($config, include $file);
        }
        return $config;
    }
}
3. app.toolstree.php —— 让它显示在左侧菜单中
这会将你的工具挂接到某个左侧菜单区块下,并转发到其控制器。melisKey 是稳定的标识符;forward 指向渲染该工具的 action。React 外壳读取的正是这同一棵树(通过 GET /melis/react-api/menu),并经过权限过滤来构建其侧边栏——因此在这里声明你的工具,正是让它出现在 /melis-react 中的关键。
return ['plugins' => ['meliscore' => ['interface' => ['meliscore_leftmenu' => ['interface' => [
  'meliscustom_toolstree_section' => ['interface' => [
    'mytool_tool' => [
      'conf' => [
        'id'       => 'id_mytool_tool',
        'melisKey' => 'mytool_tool',
        'name'     => 'tr_mytool_title',   // translation key
        'icon'     => 'fa fa-puzzle-piece',
      ],
      'forward' => [
        'module'     => 'MyTool',
        'controller' => 'MyTool',
        'action'     => 'render-mytool',
      ],
    ],
  ]],
]]]]]];
4. 控制器 + 服务
// src/MyTool/Controller/MyToolController.php
namespace MyTool\Controller;

use Laminas\View\Model\ViewModel;
use Laminas\View\Model\JsonModel;
use MelisCore\Controller\MelisAbstractActionController;

class MyToolController extends MelisAbstractActionController
{
    public function renderMytoolAction()
    {
        $view = new ViewModel();
        $view->melisKey = $this->params()->fromRoute('melisKey', '');
        return $view; // renders view/melis-my-tool/my-tool/render-mytool.phtml
    }

    public function getListAction()
    {
        $items = $this->getServiceManager()->get('MyToolService')->getList();
        return new JsonModel(['data' => $items]);
    }
}
服务继承自 MelisGeneralService,并通过在 module.config.php 中注册的 TableGateway 包装器访问数据库。
你的工具如何在 /melis-react 中渲染
以这种方式声明的工具,无需任何 React 代码即可出现在 v6 中。React 外壳只是将你现有的 .phtml 界面显示在一个 iframe 中,由 /melis/react-tool-page?key=<melisKey> 提供服务——其中的 DataTables、表单、模态框和保存按钮的行为与经典 /melis 下完全一致。这一切完全由 MelisReactOverride 处理,你无需插手。将工具重写为原生 React 积木(带有 brick.manifest.json 和 /melis/react-api/… 端点)是一项可选的升级——上文的两个向导创建器就是例子——而非硬性要求。
5. 让它可见 —— 权限
即使一个工具已被正确声明,其左侧菜单区块也只会对拥有相应权限的用户显示。权限以 XML 允许列表的形式存储在 melis_core_user.usr_rights 中:当某个区块的 *_toolstree_section 被列在其中时,该区块才可见。/melis-react 菜单正是按这些权限进行过滤的,因此未列出的区块在 React 外壳中同样会被隐藏。
从后台的 Users → Rights 编辑器中授予访问权限(为对应的角色/用户勾选你的工具并保存)。若需自动化,你也可以通过迁移脚本将该区块注入到权限 XML 中——参见平台在 flyway/sql/V3__add_melisai_rights.sql 中为 AI 菜单所做的处理。
v6 还提供了“高级权限”(capabilities)
在工具访问权之上,v6 增加了细粒度的能力(capabilities)(list / create / edit / delete,或嵌套标签页),用于对一个已获授权的工具的内部部分进行管控。它们是默认允许的——一个未声明任何能力的工具将保留完整的 CRUD,因此这是可选启用的。若你需要它,请在你的模块中声明一个 config/react.capabilities.php,并用 denyUnlessCan('edit') 来守护你的 React-API action。完整的约定参见 MelisReactApi。
小结
- 用向导生成(Dashboard / Templating Plugin Creator),或复制
melis-cms-news。 - 在
config/melis.module.load.php中注册模块。 - 在
app.toolstree.php(菜单)和app.interface.php(内部区域)中声明它。 - 实现控制器 + 服务 + 视图。
- 授予权限,让它显示在菜单中。
现在你已经拥有一个可用的工具,它会出现在 /melis-react 后台中——如果是经典 .phtml 工具则以 iframe 形式呈现,如果你用 React 重写了它则以原生积木形式呈现。从这里开始,你可以探索 app.tools.php,像 CMS 模块那样接入一个完整的数据表(列、筛选器、操作按钮)。